So as I’ve noted in a prior post, we’ve embarked on a homesteading project. One of those things that arrives as a result is chickens and a coop.
The chicken coop is a pretty good sized structure with about 120 square feet (11.1 square meters) of roof. That works out to about 90 gallons of water per inch (340 litres per 25mm) of rain that falls.
That seems to be an awful lot of water to waste. So, I’ve built a small but simple rainwater catchment & storage system. The whole project was a bit expensive, but that is because there was no rain gutter on the coop to start with.
The project cost about $200, total, which is kind of steep for a DIY 21C homestead project. However, I just didn’t have much by way of spare parts, and I didn’t really have the time to go scrounging on http://www.usedpei.com/ hoping for a deal.
I’ve got an image gallery at the end of this post, but let me explain to you what it is I did.
First, we picked up some vinyl rain gutter and a downspout. That got installed along the down-slope eave of the coop. At one end, we took a cargo pallet and cut it in four pieces, stacked them one atop the other, and used a 2×6 and long wood screws to lock them together. A pair of 50gal (190 liter) recycled ABS plastic barrels were set atop the platform.
The barrels, when full, will total out at 1000 pounds (455kg) mass in water. Thus, the solid mass of wood under it to keep it level and from sinking into the ground.
From there, the right hand barrel had a hole slightly bigger than the downspout cut into it, directly in the flow path from the downspout. The hole was covered with hardware cloth.
Then the pipe work for the barrel system started. The parts list is:
- 2 x 2-inch diameter PVC pipe, pre-cut to 3′ (1m).
- 4x 2-inch diameter PVC 90-degree elbows
- 2x 2-inch diameter T joints
- 1x 2-inch diameter to 3/4″ reducer
- 1x 2-inch diameter threaded insert
- 1x 2-inch diameter inline ball-valve
- 1x 3/4″ diameter stainless steel garden faucet
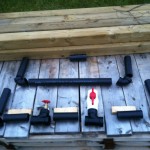
A 1-7/8″ diameter hole was drilled 1-1/2″ from the top and bottom of each barrel, on the side facing away from the coop. Before I did anything else “permanent”, I stopped and laid the parts out in a concept layout that matched my pen-and-paper design to ensure that I didn’t have “hmm, that’s not right” moment.
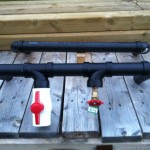
Essentially, there are two pipes running between the barrels. One is at the top, and is used to allow air to move back and forth between the barrels, and act as secondary auto-level for water. The second pipe is at the bottom, and has the large-diameter ball valve and the garden faucet in between the two barrels. These fixtures allow the system to either be rapidly dumped, or used to run a garden-hose for something like drip irrigation. Also, since water “seeks its own level”, as water pours in the left hand barrel from the downspout, it will flow into the right hand barrel via the lower pipe.
The upper air pipe is there to prevent the right hand barrel from becoming pressure locked. I’ve seen a lot of YouTube videos and blog comments about this being left out of multi-barrel systems, and it causing headaches of various sizes. I’m happy to learn from other people’s experiences when building my own first system. 😉
You’ll note that there is a short piece of pipe that extends back from each elbow joint. These joiner pipes are there to have something to “hold” the entire thing in place while the adhesive sets. Essentially, those pipes are pressed back about half their length into each barrel and then cement adhesive applied.
With the design concept verified by eyeball, I took some measurements and did a bit of cut work, so that everything was properly distanced for the hole-to-hole measure of the top and bottom of the barrel.
The next step is doing a “glueless” or “dry” assembly so that I could ensure that everything would behave the way I wanted, beyond leaks, of course. We used a propane torch, heated the barrel plastic so that it was slightly elastic, and then pressed the joiner pipes into the barrels. We then put the whole system together and put about 10 gallons (38 litres) of water into the rain gutter with our garden hose.
Everything worked as I wanted. Water levels were equal between the barrels, even with the right-hand barrel being sealed. The faucet and ball-valve worked as they were expected to. So, we drained the system dry, and then glued everything together. We then put a thick layer of silicone sealant around the points where the pipes entered the barrels.
Naturally, it hasn’t rained since, but that’s ok. Once it does, we’ll be running a line from the faucet to the outside watering station for the chickens. A turn the tap will refill the watering station with rainwater. The larger diameter ball-valve will be used to fill things like watering cans for the garden.
Once we’ve had some more experience with the how the system behaves with full barrels, then we will look at setting up a larger six barrel system for the downspout from the house. The back side of the main roof is over 770 square feet (71 square metres) which will yield almost 580 gallons (2195 litres) of water for every inch (25mm) of rain that falls on it. Six barrels will hold 300 gallons (1140 litres) of water, but the idea is that eventually the system will be expanded as we find more free barrels.
That said, even with just (!) six barrels, we would have enough water to handle our garden needs for a two week dry spell without touching our well water. Where over half the cost of the coop project was in the installation of the rain gutter, I actually expect that the house project won’t be nearly as high.
Rainwater catchment is one of those places where a bit of planning can make a big difference in how “connected” you feel to the land you live on. The first time that my wife and I emptied a 50 gal (190 litre) rain barrel using a watering can to water our garden, we got a better idea of what we take for granted when we ignore or complain about the rain, or just thoughtlessly turn the tap on to run the sprinkler.
Contrary to popular belief, water isn’t free and it isn’t unlimitel. Particularly not pure, clean water. Harvesting the “wasted” water that hits your roof and winds up in a drain is a good way to ensuring that a small homestead project has what it needs.
-
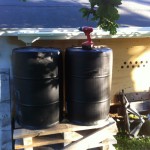
- Rainwater Catchment – Rain Barrels under eaves
-
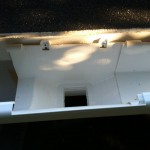
- Rainwater Catchment – Downspout detail
-
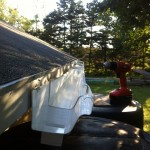
- Rainwater Catchment – New rain gutter
-
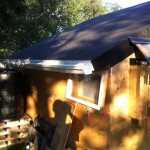
- Rainwater Catchment – New rain gutter
-
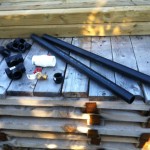
- Rainwater Catchment – Loose Parts
-

- Rainwater Catchment – No-Cut Dry Assembly
-
- Rainwater Catchment – Concept Layout
-
- Rainwater Catchment – Post-Cut Dry Assembly
-
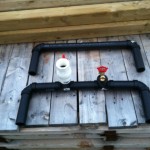
- Rainwater Catchment – Post-Cut Glued Assembly
As always, I’d love to hear your thoughts and experiences. Thanks for reading.