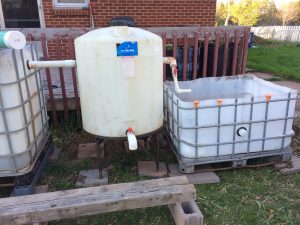
This is a 455L / 120USG tank, used for heavy solids settling. It’s a “new to me” tank, salvaged from an industrial discard bin by a friend, and cleaned out thoroughly. Water comes in on the “left” side of the tank, via 50mm/ 2in SCH-40 PVC pipe, and is directed downwards by a 90-degree elbow connected in turn to a 75mm / 6in piece of pipe. The elbow and inside pipe are rotated 45-degrees towards the “back” of the tank to induce a very slow clockwise turn in the tank. The Heavy Solids Settling Tank (HSST) stays at about 340L full, via a SDL on the right side of the tank. At the bottom of the tank is a 25mm / 1in SCH-40 PVC pipe, exiting to the front, which can be used to drain the tank from the bottom. This is to remove accumulated solids from the tank as required.
That SDL is connected to another 50mm / 2in pipe which runs to next tank in the chain, which is the bottom ⅜ of another IBC. This is used as the sump tank for the system, and can hold a maximum of 700L / 185USG. In practice, it holds about 40% that much.
The 50mm / 2in line coming into the sump tank from the left side does so nearly 75cm / 30in above the surface level of the sump tank. It drops down and is split into a pair of 2 25mm / 1in lines which then drop into a pair of bio-filters. I’ll discuss the design of the bio-filters later, but these two DYI-made canister-filters represent the bulk of the Biological Surface Area (BSA) of the system, and therefore the majority of the biological filtration of the system.
The pump located in the sump is a 1400Lph unit, which is the same pump I had been using the greenhouse build. This lifts the water from the sump up about 1.5m / 5′ to the grow-pipes. I’m not using a conventional heavy-media grow-bed as I did with the greenhouse build and the two basement builds.
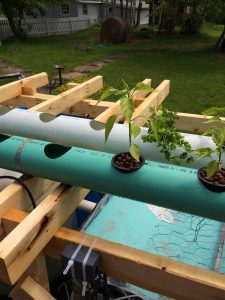
Instead, I’m using a series of 100mm / 4in pipes with 75mm / 3in “net pots” in them. Each of the “grow-pipes” ends in a fairly typical bell-siphon which shoots the water back into the IBC fish-tanks where we started from. I’ll discuss these in more detail shortly. The important part to notes is that each pipe has it’s own water feed into the pipe, and bell siphon to drain it.
The line from the pump to the grow-pipes is 20mm / ¾in flex hose, using typical barbed fittings and hose-clamps. It has a “bypass” valve that lets me divert any percentage of the water from the pump directly back into the sump if I need to do so for some reason.
The pump size lets me pretty confident that I’m rolling the water on the fish tank around once an hour. The 25mm piping, of course, will handle nearly double the volume of water the pump is generating, but that is okay by me. I know that there should not be anywhere in the system that water is under significant pressure. As well, even a partial blockage in a pipe should not restrict water flow enough to cause a mess.
That’s the end of “Part I” of this series. I’ll talk about the build process for the grow-pipes in Part II, as well as discuss the potential limitations and problems with using them.
Please leave any comments, questions or suggestions in the chat section below. I’d love to hear from you, and I’ll do my best to respond to everyone. Cheers all!

